Monday, February 17, 2014

LO share

 
Stopping by to share!  This first one uses an old CTMH line
of papers and stickers, along with a cut from one of the CTMH
Cricut cartridges (the beige mat under the photo). 


This next one uses Simple Stories though I can't remember if it's
Daily Grind or 24/7.... it's from a boatload of papers & goodies that
my bestie sent me last year! 
 
 
The bottom two drawings on this layout are actually pictures that I took
of one of Nick's book covers, from his school books.  The book fell out of his
backpack and I thought his little story was too funny and way
cute.  It *had* to be documented.  ;-) 
 
 
I also used up some Elle's Studio wood veneers and Thickers for the title.
 
Thanks for stopping by and leaving love!
 
Blessings,
Martha

Wednesday, February 12, 2014

Ink matters!

I recently got CTMH's Timberline Workshop on the Go.  It has a great
stamp set and I think it's perfect for our bike-riding pictures.  My sister
has taken my kiddo up to Enchanted Rock a couple of times and I'd like
to go myself, go for a nice hike and enjoy nature.  Of course, I don't want
to go on that little day trip just because I have this paper... it's just an added
bonus that I already have the layouts completed for any pictures I might take!
 
So-- about the ink.  The Timberline WOTG stamp set has a couple of
images that are larger.  I stamped them with dye ink... and didn't like
the outcome.  I have some of the CTMH pigment ink and thought
why not give this a whirl.  The results are interesting!
 
 
Above, Goldrush dye ink.  Below, Goldrush pigment ink. 
See how the negative space is properly stamped
without looking grainy or washed out?


This is the stamp AFTER I stamped it.  See how the letters are full of ink? 
I was sure this ink would have gone onto my paper but it did not!  Note:  To clean
this stamp properly you should spray your liquid cleaner directly onto the stamp
before running it across a scrubber.  Baby wipes work well too-- just
make sure they're alcohol free as alcohol with cause the stamp to crack.
 
 
Here's another example.  Left side is pigment, right side is dye ink. 
The clarity of the letters and lines along the border is pretty remarkable!  You're
supposed to lay your paper on that foam insert that comes with your stamps,
which is what these two stamped images is resting on.  But that didn't matter
when stamping with the dye ink, not for this stamp.  The surface I stamped
on, the amount of pressure I applied, the amount of ink I had applied to the
stamp, nothing I did would make this stamp with perfect clarity... until I
got out the pigment ink and got it right on the first try. 


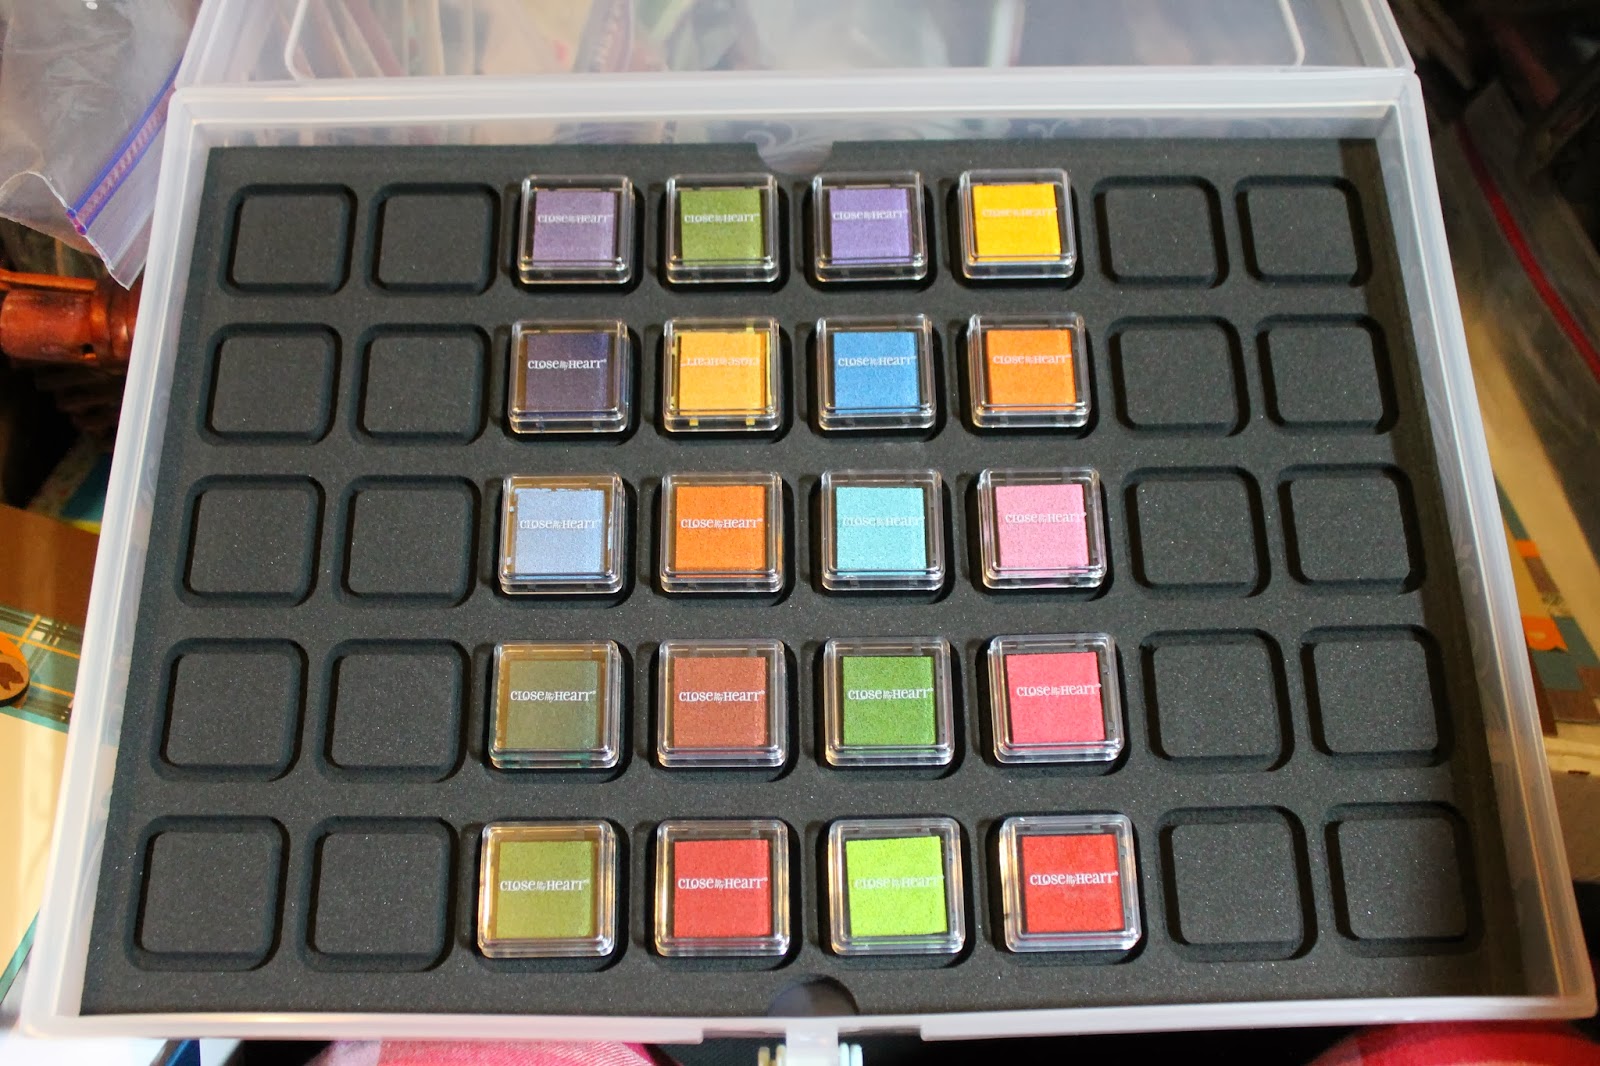
CTMH sells the pigment inks in color families, of which there are four. 
So for around $20 you get 10 of these little pigment inks in matching colors;
add the foam insert and plastic organizer for a bit more moolah and you're all set!
You can see that I only have two of the four sets.  ;-)
 
 
It's the smaller organizer that these fit into. 
 
 
And the layouts I used those stamped images for are the following pictures. 
On this next pic, though, you see my "making tracks" that's stamped with
pigment.  The "you are here" is stamped with dye.  These don't look
very different; I think it's because "you are here" is a smaller stamp with
not as much dead space that needs ink coverage. 


Here is the full two-page layout. 


And the other two-page layout (this is the one whose instructions are part
of the Workshop; the layout above was made with instructions found at CTMH.com): 
 

"Explore Your World" is my title and this is where I first discovered how much
better the pigment ink worked.  Now I just have to work on CENTERING
my images (onto the previously die-cut shape).  :-)
 
 
That little Earth and the little people around it?  Those are stamps included in
the set.  Is that not adorable!!!  I have card ideas with that little Earth stamp in mind...
 
 
The top right colonial white square with footprints is where
I will draw lines to add my journaling later. 


 So there you have it!  Dye versus pigment ink with CTMH stamps.  I
was also playing with some Technique Tuesday stamps, which are made
of different material than the CTMH sets, and the pigment was LOADS
better with those as well.  Just remember, too, that when using pigment
ink your stamped image will take longer to dry.  Don't just grab it, glue
 it, and go because it will SMEAR!  Let it dry for a little bit. 
Trust me on this one.  ;-)

Thanks for stopping by and leaving love!  And stay tuned for some
masculine cards I'm going to make with the leftover
paper from this workshop set. 

Blessings,
Martha


Good pictures

There is just something about a good picture that makes my heart sing. 
Last week was Western Day at Nick's school-- the rodeo is in town!-- and
of course he donned his cowboy boots and hat and his crazy-big belt buckle.  LOL 
 
Anyway, they had a breakfast for us parents & kids and I had the chance
to take a few pictures.  Check this one out.  OMGosh it makes me SO happy. 


The boys were smiling for the fourth grade teacher who was taking pix for the
school yearbook.  I love that they aren't looking right at me... and I love all of
these boys.  On the far left is Gabriel and then Nicholas; they are cousins.  In
the middle is Jacob and on the right, of course, is my own little ray of sunshine
(with the occasional rainy cloud lol). 
 
The thing is, these kids have been classmates for 6+ years,
since Pre-K.  I love  those other boys like my own.  I love their
parents-- grandparents in the other Nicholas' case as his Mom died a
couple of years ago & his Dad is off somewhere. 
 
So I printed this out as an 8x10.  I want to put it in a frame to display... just
because I love all of these boys so much, and I think Nick considers them
his brothers.  They kind of are brothers as they're growing up together and
know each  other so very well. Eight hours a day, five days a week
for 6+ years-- yeah, I'd say they know each other pretty well.  :-)
 
Blessings,
Martha

Tuesday, February 11, 2014

Embossing is boss!

Dry embossing is easy and fun.  Whether you have a Cuttlebug, Big Shot,
Sizzix, or Spellbinders machine, they are all pretty much the same and
create stunning effects-- with the right embossing folder of course!
 
This month CTMH is offering one of their five embossing folders for FREE
with the purchase of two packs of cardstock, either single colors or
multi-packs (of all but the basic colors). I played with two of them,
along with Lagoon cardstock, ink, and twine, and a couple of stamp sets. 


I also used Perfect Fit Frames-2 (D1536) and Holiday Tags (D1560).


SHOP HERE:  Martha's CTMH website
 
 
Blessings,
Martha
 

our selfies

So I was playing with my Canon printer, which I *love* because not only
does it print really well but I can print through WiFi from my
iPhone (!), and I was trying to print four smaller pix onto
one 4x6 paper.  I have an app called A Beautiful Mess on my phone
and I was messing with that, too.  FUN! I wound up with 3 sets
of the same four pictures but I never quite got the sizing right. 
 Of course I wasn't going to throw away the pictures!  I made a
page about them.  All funny angles and all.  :D  I also left
the white borders intact.  Title is Thickers and Simple Stories.
 
 
I used up some of the Elle's Studio wood veneers and tags.  I LOVE
Elle's Studio!  I also used up scraps from Simple Stories' Daily
Grind and I Heart Summer collections. 
 
 
These super cute enamel dots are Heidi Grace Designs! 
 
 
Until next time, thanks for stopping by and leaving love!
 
Blessings,
Martha
 

Monday, February 10, 2014

Lollydoodle card kit

Lollydoodle!  Cards!  Sequins!  GREAT stamp set!!!
 
The following three cards make up the cardmaking kit.  Super cute, super easy,
and I LOVE the stamp set (in case I haven't mentioned that 30 times already!)! 
The kit comes with 15 pre-cut and pre-scored white cards and matching
envelopes, with step-by-step color instructions to make five
of each of the following cards. 


(I only made one card with "Love you", leaving the other four
for this set blank so I can add the sentiment of choice whenever I need).

 
I just love the stamp set!  I used it on a layout on the
previous post and I'm *sure* I'll use it yet again. 
 
Thanks for stopping by and leaving love! 
Oh and if you'd like to purchase the card kit shop here:  Item G1080
 
Blessings,
Martha


Thursday, February 6, 2014

CTMH Blog Hop Part II

Yep, I have more work to share with you!  Follow on through this
CTMH Blog Hop and find inspiration for all of our new products. 


The Skylark paper I used in yesterday's post?  The background patterned
 paper of this layout is the other side of that paper.  Waste not, want not!  ;) 
I used the Artbooking cartridge for some borders and the tag. 
I added Lagoon houndstooth washi tape, Lagoon twine, and Durables
 Triangle Studs.  The stamp on the tag is from the
Lollydoodle cardmaking kit.  That one stamp was my first
 must-have out of this new catalog.  :)  "Love YOU" is also a
stamp from the same set. 


I used some of my Skylark scraps along with the Hostess Rewards stamp
set, Enjoy the Little Things (B1451), for the following card.  The sequins
are from the Lollydoodle cardmaking kit.  After stamping the flowers
and grass I used colored pencils to fill them in.  I'm considering adding
clear Stickles just over the flowers for a little extra pop. 


Click on any of the thumbnail pictures below to continue on
the blog hop.  Thanks for stopping by and for leaving love!
 
Blessings,
Martha


Wednesday, February 5, 2014

Hey foxy!

The current CTMH Stamp of the Month is uber cute!  Check it out! 


And some art work created with it:
 
 
And a couple of cards that I've made with that stamp:
 
 
I made the card above with Ruby and Champagne cardstock,
Huntington patterned paper, and Chocolate ink.  I also used the
scallop edge punch, drew those lines around the shape, 
and used a paper piercer to punch the holes.  "Hey foxy" is
on a chipboard banner that I covered with Ruby cardstock.
 
 
This next card is using Ruby and Champagne cardstock again.  I used the
Cricut Artiste cartridge to cut all 3 pieces (the white paper for
 the sentiment, stamped with Ruby ink).
 
 
Can you tell that I stamped hearts all over the Champagne cardstock?  :-)


 Find the Febuary SOTM Wild About Love here: S1402
 
ALSO!  The February deal is all about embossing.  Dry embossing, that is!
 
 
As it says, purchase 2 packs of bulk single or combo colored
cardstock and you can have one of our five new embossing folders for FREE
You can see all five choices here:  CTMH Embossing Folders! That is an $8.95 value!
 
I hope you like what you see and if you have any questions or want to order,
use the "contact me" form on the right-hand column and I'm happy to help. 
 
Have a crafty day and BLESSINGS!
 
Martha


CTMH New Catalog Blog Hop!

CTMH's new Spring/Summer catalog is now available for viewing and purchasing!  There are several must-have new paper lines and, of course, stamps!  Some of us consultants have once again gotten together to showcase our new pretties so hop right along from blog to blog and be inspired by CTMH's newest must-haves. 


I just got some of the new papers in yesterday and I've already played with the Skylark patterned paper and embellishments, as well as some of the hostess-only stamps.  Here is my first creation:

 
I used the Cricut Artiste cartridge for the background mat of my main 6x4 photo.  My journaling block was made with the "This is Good" stamp set (A1160), which is available as part of hostess rewards, and the lines for the journaling block come from Stitch Wonder (C1564).  I've left space above that journaling block for my title, which I will decide on when I have the perfect pictures!


Distressed edges.  Yeah, baby!

Products used:
Skylark Paper Packet X7177B
Skylark Assortment Z3000
Stitch Wonder C1564
This is Good A1160
Chocolate stamp pad Z2111
Champagne cardstock X5931
Cricut Artiste Z1790
Edge Distresser Z1297


Thanks for stopping by the New Product Blog Hop! To view all the other entries and see more Close to My Heart new product inspiration, click below on the thumbnails!  This hop is open until February 9th, so check back often to see more entries from me and others. 

Blessings,
Martha

Sunday, February 2, 2014

One thing I'll never be accused of...

...is not including myself in our scrapbooks.  ;-)


I took a selfie and got my 2014 goals in the books.  Remember, if it's not
in the scrapbook it never happened!  So these 2014 goals have
now "officially" happened.  LOL


Webster's pages paper and flower, Elle's Studio journaling cards & wood. 
The teal background is cut using the Cricut Edge to Edge cartridge. 


Here's another one.  This is from the trip to Port A with some of my
girlfriends last November.  Webster's pages, all but the tag to the left
of the photo (Echo Park).  I used a little brown envelope, also Webster's, to
hide my journaling.  I had a lot to say but wanted it private. 


Here the journaling is peeking out of the envie.

 
Here is my journaling pulled out of the envie.  It's a trifold card; I just measured
how wide my envie was and then made my journaling into three columns
 in MS Word.  Then I printed it out, trimmed, adhered, and finally scored the
edges to make it trifold.  It's double-sided too; I have 5 "panels" of journaling. 

 
That is all for now.  Thanks for stopping by and leaving love!
 
Blessings,
Martha