To celebrate the catalog release, a few of us consultants have gotten together and made samples for you all to enjoy. At the bottom of this blog post you'll see the links to everyone else's blogs. Cruise through to find inspiration from a very talented group of ladies!
Have you seen the catalog? There is a gorgeous set of paper and, of course, lovely stamp sets to go along with it. I got busy creating with two of the stamp sets from the mini catalog, one called Santa Claus and the other called Magical Days.
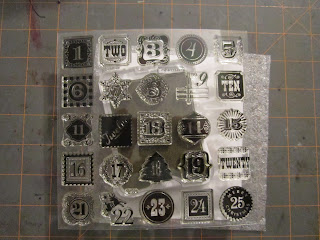
For my first card, I stamped white cardstock with Bamboo ink... I wanted a background but I just couldn't bring myself to place each stamp onto a block and try to position it perfectly...sometimes I'm lazy LOL... so I stamped directly from the sheet where the stamps are stored.
VOILA:
I don't recommend doing this often; it worked because I wanted a subtle background
and not perfectly clear, even images. Next, I cut out a scallop circle from the Art Philosophy cartridge, onto which I stamped Santa in Ruby. I used the Artbooking cartridge to cut the shape where I stamped the "Merry Christmas" sentiment, which I stamped with VersaMark and embossed with black. The other two circle elements are stamped on champagne cardstock and punched out with a basic 1" circle punch. Those are green stickles on the Santa scallop shape, and I did round the corners of my card base, as well as ink the edges with Ruby.
A couple of the elements are on pop dots for added dimension.
Next, I took the Santa Claus set and started stamping. :) First, I got a sheet of regular cardstock and stamped a background using the snowflake stamps and the "ho ho ho" greeting. This is with Bamboo ink. This will be cut up and used as my card base.
Next, I cut up more of the same cardstock (unstamped) to accommodate the Santa Claus stamps. I do this as an assembly line production...
I used SU! oval punches to use beneath the stamp "Santa Claus" stamp, but of course you can use your Cricut and Art Philosophy cartridge.
I mounted everything onto Ruby cardstock, and the largest oval is Topiary cardstock.

My finished card, with green Stickles on the greeting, and there are pop dots between the ovals. I also used the border stamp along the bottom edge of my card, which is Topiary cardstock:
Supplies used:
Santa Claus stamp set (HERE)
Magical Days stamp set (HERE)
Topiary cardstock (HERE)
Ruby cardstock (HERE)
Bamboo cardstock (HERE)
Bamboo ink (HERE)
Black ink (HERE)
Ruby ink (HERE)
Art Philosophy cartridge (HERE)
Artbooking cartridge (HERE)
Thank you for joining me on this blog hop! Thanks for leaving love, too. ;-)
Check out more wonderful, original, and unique artwork at the links below.


I love making my own patterned paper, so love your idea of using the countdown stamp set to create a pattern.
ReplyDeleteCute cards! Love your idea to use the Magical Days stamp set to create your order background paper!
ReplyDeleteLove the idea of using the stamp to make background paper! Looks great!
ReplyDeleteInteresting use of that numbers stamp set to create a background. Nice and subtle.
ReplyDeleteLove the Santa's!
ReplyDeleteI love your creative use of those number stamps!
ReplyDeleteJust beautiful! Thank you so much for the wonderful idea of stamping straight from the sheet :-)
ReplyDeleteLove how you used the carrier sheet to stamp the background numbers--they are so evenly spaced! Thanks for sharing this technique and your fun card!
ReplyDelete:) Marie
I love this stamp set so I'm so glad you used it. Good job!
ReplyDeletelove making my own paper! thanks for the inspiration!!
ReplyDeleteCute cards! I like how you used the stamp set. Now I am feeling like I need to boy it lol
ReplyDelete