Sunday, October 13, 2013

on the fence about the Frosted cardmaking kit

Yep, that's me, on the fence.  Living in central Texas, well we don't have much of a winter, and we hardly ever get snow.  So why would I want any "frosted" papers or cards?

Well, my sister solved that problem for me by ordering the cardmaking workshop and letting me make one of each card so I can display to you guys.  And guess what happened?  I want it.  I *really* want the stamp set anyway, because I know I can get lots more use out of it! 

This is the whole kit, available for purchase (HERE):


Look at the stamp set.  The border is versatile, the background stamp (the square in the middle) can be used many ways, and the "merry & bright" sentiment is fantastic.  I see myself using the "peace and joy" and "holly jolly Christmas" sentiments on Christmas cards, too.  The snowflakes are great for backgrounds too, and I do have some winter pics to scrap about.. :)


 This is the first card:

 
The second card:


And the last card:


I love the details:


Now, the cardmaking kit includes both the card bases and matching envelopes, and both are high quality cardstock, which I love. 
 
This next picture is of the leftover cardstock.  There's quite a bit left for more cards and/or a scrapbook layout(s).


Not to mention, the stamp set goes into the stash.  I love the CTMH scrapbooking and cardmaking workshops as you get so much bang for your buck.  Click on the "Come and shop with me" link on the top right column, or contact me to arrange your very own hostess party.
 
Thanks for stopping by and leaving love!!!
 
Blessings,
Martha

Friday, October 11, 2013

that one card...

Hi there!

I want to share how I made the card that I lifted from Jennifer McGuire...

I said in the other post how I stamped in VersaMark and heat embossed the stamped images with black and silver, and then I shaded the white background.  First, I used a sky blue color:


Next, I added Pacifica:

 
And finally Smokey Plum:


Here is my A2-sized card with the punched circle, also shaded a lovely Bamboo color:

 
I added the square Nativity behind the circle:

 
But that looked too plain so I stamped and embossed on the front:


Shiny and raised.  Love it.


Finished:
 
I changed the camera's focus so you can see just how shiny the embossed part is:

 
After all of that, it still looked just a tad plain, so I got the Sky ink and inked stars around the top half of my card front.  It's very subtle:
 
 
And don't forget to stamp on the inside.  I added another piece of cardstock on the inside so that the square wouldn't be showing. 
 
 
Again, the CTMH stamp set I used is called Glory to God, available for purchase (HERE).
 
Thanks for stopping by and leaving love!
 
Blessings,
Martha
 

Christmas Cards, part 1

Hello crafty friends!

I've been a busy bee making Christmas cards.  Yes, I'm a bit early but I like to be prepared AND I'm hoping to sell a few sets either on Etsy or eBay.  If there's a card you'd love to have a set of, let me know and I can hook you up! 

This first one is probably the easiest one I made because it's all Cricut cutting.  The card itself comes from the Quilted Christmas cartridge, and the "Merry Christmas" is from the Teresa Collins Dec 25th cartridge.  I added some buttons, bling, and stickles.


This next one is also from the Quilted Christmas cartridge, and the stamped sentiment is from a CTMH set called Glory to God (which I used again in another card, posted below).

 
This next one was simple too; I embossed the green glitter paper, used an SU! ornament punch on vellum, which I also ran through various embossing folders, and added the twine.  There's a stamped sentiment on the inside of the card.

 
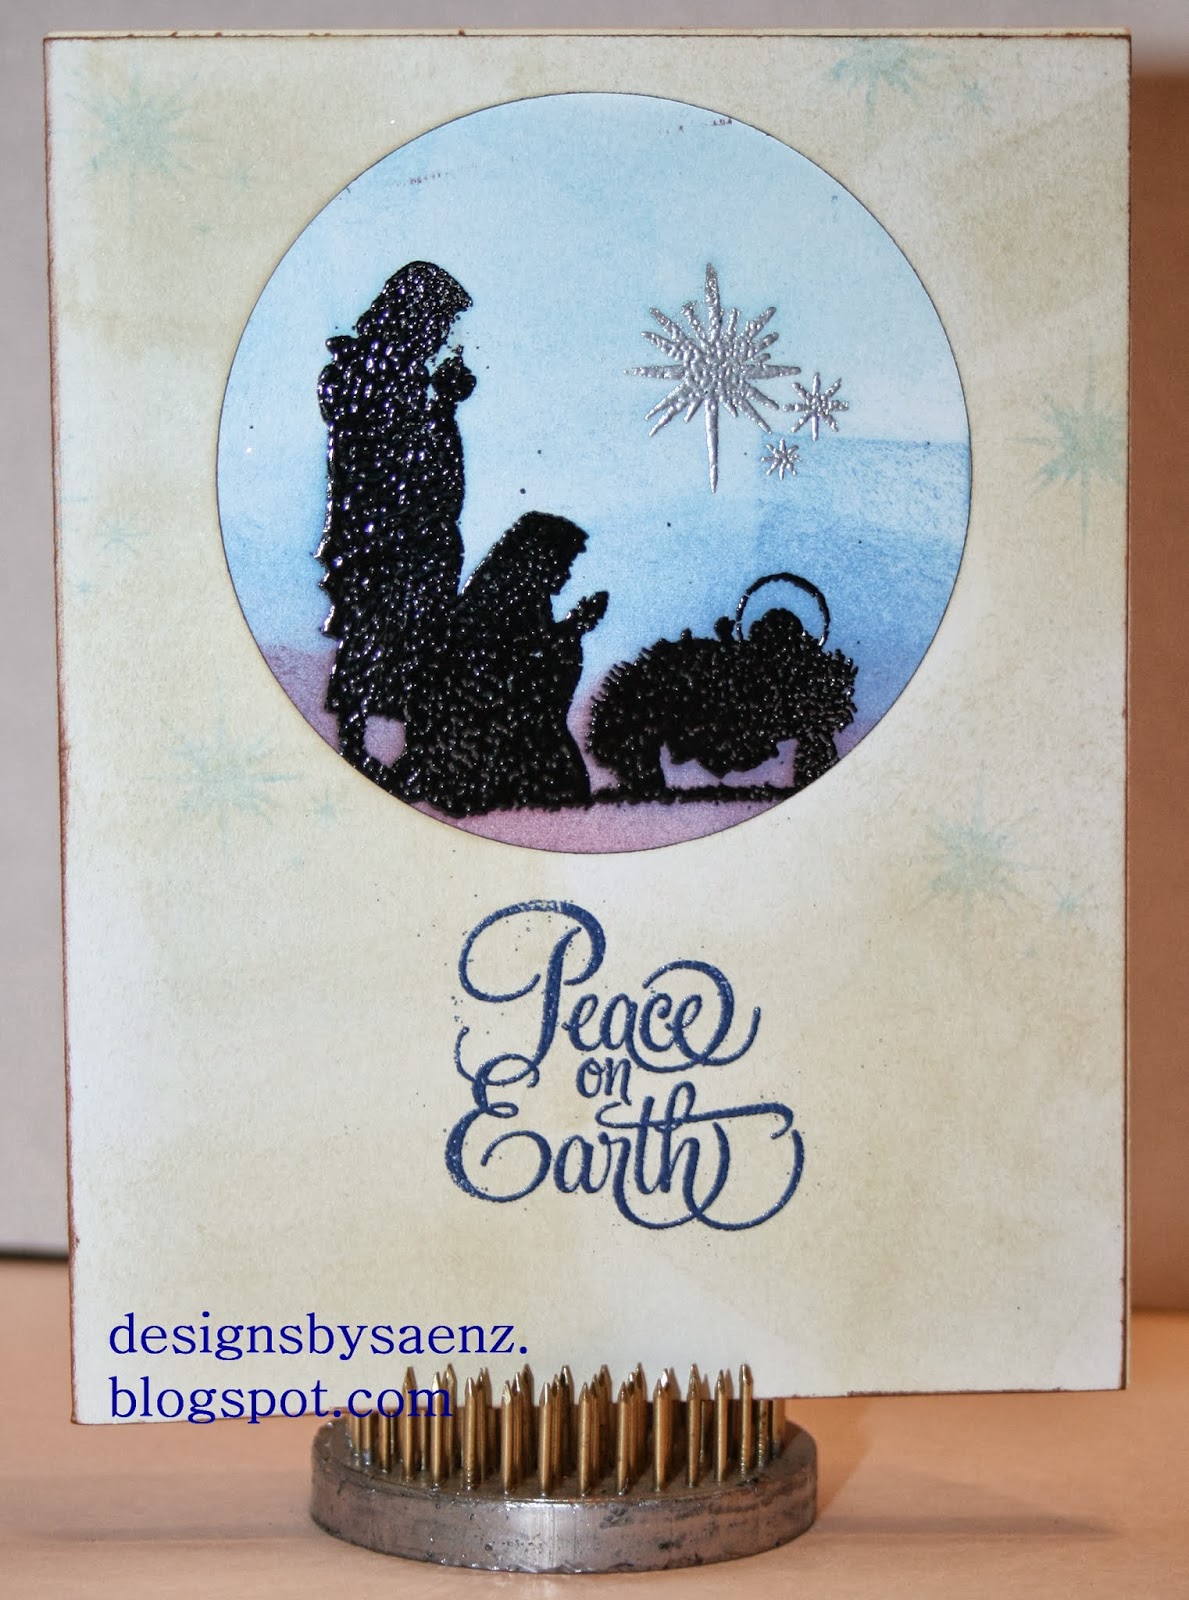
Finally, my favorite from these sets, again using the Glory to God stamp set (available for purchase HERE).  I copied an idea from Jennifer McGuire.  On a piece of white paper I stamped with VersaMark, embossed with black and silver (the stars), and then used sponges and ink to the background.  Next, I punched a circle out of my card, which I also inked with Bamboo ink and then stamped the same stars with Sky ink, and I placed my embossed piece behind the circle.  Finally, I stamped and embossed the "Peace on Earth" sentiment on the front. 


That's all I'll share for now-- stay tuned for more Christmas card inspiration!

Blessings,
Martha

Thursday, October 10, 2013

Flip Stand Album

Here is the latest installment of the Artbooking Made Easy YouTube series. I have to get one of these flip stand albums now... :)
*If you're getting this post via email, you will have to click on the link to my blog to be able to see the video. TY! Blessings, Martha

Tuesday, October 8, 2013

Baby shower!

My dear, sweet friend Gabriela graced us with her presence this past Saturday, all for the purpose of celebrating the blessing God has given her.  Her precious first child, Samuel, is due in February and those of us that love her couldn't be happier!  Having met in Bible study at Community Bible Church, our girlfriend relationship is close and God-centered, as every relationship should be! 
 
So in preparation for the shower I had fun making a few goodies. 
 
First, I bought these bags at the dollar store.  Yes- the dollar store!  My Cricut can cut these bags, but it's way more cost effective to get 12 to a pack-- for just a dollar!-- already cut and ready to be folded.  I found them in the bridal section, and being plain white makes it easy to dress them up however you please. 
 
 
So I stamped some stars (CTMH stamps) with slate gray ink.
 
 
I cut blue strips to wrap around the bag and stamped that with a star border (CTMH) also. 
 
 
Using the Cricut Animal Kingdom cartridge, I cut the little lamb out and used a sponge with the same slate gray ink to give the white some texture.  Layer it all on, add blue tissue paper and candies to the inside, and voila, treat bags.  (I used a fine black pen to color in the eyes, nose, and other details.)
 
 
Next, I used the Noah's ABC Animals cartridge for more little lambs.  On these I used the same slate grey ink to add color, as well as Liquid Applique.  The Liq. Applique comes in a pen and you can draw anything you want with it; use a heat embossing gun to warm it all up and give it the raised, wool-looking effect!  This stuff also works really well for cupcakes, clouds, Santa's beard...
 
 
(Above it's still gooey, below it's been warmed up and it's puffy!)
 
 
Voila!
 
 
I added Stickles to the eyes, nose, and ear area for some extra sparkle.  Finally, I added wooden sticks to the back of each lamb, using one lamb on one of the cakes I made, and other lambs for placing in decorative boxes with candy.
 
 
Next, I made a banner, made up of six pennants, one shape on each end and "BABY" on the pennants in between.  I cut each letter out three times, twice in green so I could use pop dots for dimension, and once in blue for the very top layer.  I used the Cricut Baby Steps cartridge for this font and the Art Philosophy cartridge for the pennants  Satin ribbon is SU!, and I used the same star stamps from the treat bags above to stamp on the tan piece of cardstock.  I also used a border stamp for the faux stitching, added bling, and called it done. 


Here's the display table where we put a few gifts, the treat bags, and my Baby banner.  (Crown from Teresa Collins Sophisticated cartridge, circle baby pin from Mini Monograms cartridge.)


I also made onesies, adding toothpicks on the back, to be used as cupcake toppers.
 
 
Next, I made a 5x7 piece to be put into a frame for decorating baby Samuel's room.  I used the Baby Steps cartridge to cut out (after welding) his name, welcome, and baby.  Buttons from stash, twine is CTMH, scallop punch and ribbon are SU!, and you can see that I used the same CTMH star and faux stitching stamps around the edge. 


Lastly, I made a 12x12 layout to put into a shadow box with the title "God has heard" because that's what Samuel means in Hebrew.  I failed to get a picture of that... oops!  I also made a couple of cakes and cupcakes but didn't get pictures of that, either.  For shame, for shame because I forgot!!! 
 
Here's a group picture of our little group of Bible study girlfriends.  Gabriela was visiting from Dallas and her sister visiting from Venezuela, and we were missing Feride, who moved to Colorado.  That's me on the right wearing stripes (what was I thinking?!) and a cheesy grin, and our gorgeous Gabriela just glowing next to me.  :D
 
 
Sweet friends, wonderful fellowship, all for the glory of our faithful and loving God.
 
Blessings,
Martha
 

Monday, October 7, 2013

School layouts, Artbooking style

I played with the Artbooking cartridge to make these layouts the day before school started- Aug 18th- and I just now got the pictures onto the pages.  The whole school starting thing set me back just a bit, LOL. 


This is the left-sided page of the first layout.  See how the top red has a hole cut out?  That's because I cut the background of the bottom "hello" piece out of there.  After all, that top red piece will be covered with photos and nobody will ever know that hole is there.  Have you ever done this?  I have very limited resources so being frugal is always important to me. 

 
Here it is, covered up.  Even though I made the pages the day before school started, I didn't take the right pictures; this was supposed to be a horizontal 5x7 but I just plain forgot when I was snapping photos.  Oh well.  I made it work anyway.  I added minimal embellishments since the background piece is so very busy. 
 
 
And this is the right side of the two-pager.  I used a star border stamp for some of the details on the corners and near my title. 


Using the Artbooking cartridge is SO easy!  I used one button along with a couple of function keys and hit shift a few times, and everything cut out proportionally.  It just couldn't be easier. 


 This is the left side of the next two-pager.  Once again, I repeated photos because I didn't take enough on that morning!  I used another CTMH border stamp around the blue because it was too boring, and I didn't want to add a whole lot more.  Stickers, journaling are from my stash (Creative Memories, I think).  And I used a white pen to outline the title so it would stand out a bit more.


Right side of the two-pager.  Since I'm volunteering at my son's school to help the kiddos make personal yearbooks, I have pictures of all of Nick's classmates.  The ones I decided to include are the kids who have been in the same class together since pre-K.

 
I used Stickles to accent the apple a bit.  And there you have it, four pages that I made in less than 30 minutes thanks to the Artbooking cartridge. 
 
***
So about the yearbooks, I first got the idea from Becky Higgins (visit her blog post HERE).  Her oldest son is the same age and grade as my Nick and she's been doing classroom personal yearbooks for years now.  This is only my second time and I'm not following her as closely this time as I did the last time, Nick being in parochial school.  This is what ours look like (I'm making the teacher's myself):
 

I chose simple three-ring binders purchased in bulk at Sam's, and the front cover will be a page that the kids can sign for each other with well wishes at the end of the year.


Cover page:


Prep work:
 

Each kid has their one zip-lock bag where I can divide up and distribute their materials.


This whole yearbook project is more about journaling than anything else, and they will be getting a writing grade for it, besides a grade in art class.  Taking the pictures, designing and printing the pages, and getting everything prepped is quite a bit of work, but I love it.  I absolutely love it!  And I love being a part of Nick's classroom for one morning per month.  That part is just priceless.  
 
 
If you'd like to make something similar in your child's classroom, I'm happy to share my page designs with you.  Just leave me a comment below with your email address and I'll get the Word files to you.
 
Blessings,
 
Martha